![]()
Laparoscopy creates a picture window in the abdomen, through which the
intraperitoneal organs may be closely inspected, far better than the abdominal
surgeon can do through an incision a few centimeter long stuffed with instruments,
sponges and lap sheets. The basic principles of laparoscopy today do not
differ significantly from those described by Palmer in 1954. Adequate pneumoperitoneum
is essential to safely introduce the instruments and visualize the abdomen.
What has changed signficantly over the past 40 years are the sophistication
of the instruments, with the last development of miniaturized instrumentation
for office procedures, and the complexity of the procedures that can be
performed.
Technique
Preoperatively, the patient is appropriately
informed regarding the contemplated therapeutic effects and potential complications
from both the surgery and from the anesthesia by the surgeon and anastesiologist.
A mini-mons prep is performed prior to surgery by the OR team or by the
patient at home the night before. If extensive cul de sac dissection is
anticipated, the patient may be asked toevacuate the rectum with enemas
and or administer a bowel prep.
| After the induction of anesthesia and placement of the endotracheal tube, the patient’s legs are placed in padded stirrups and positioned in such a way as to provide good support and to allow for a normal anatomic position. The arms of the patient may be placed at her side, padded with foam troughs and secured by a sheet, thus allowing the surgeon and the surgical assistants to stand adjacent to the patient unemcumbered. Once the patient is positioned, the operator preps the patient’s abdomen, perineum and vagina with Betadine or other suitable bactericidal solution and places a Foley catheter, to empty the bladder and monitor urine output during the surgical procedure. After pelvic examination, a uterine manipulator is applied to the cervix to mobilize the uterus and for chromopertubation through an injection port. The umbilicus provides the most optimum location for inserting the Veress needle and for the primary trocar. At the level of the umbilicus, the skin of the anterior wall is attached to the fascial layer and anterior parietal peritoneum without any intervening subcutaneous fat or muscle. Therefore, the intraumbilical approach offers the shortest distance between the skin and the peritoneal cavity and can be successfully used even in very obese patients. | 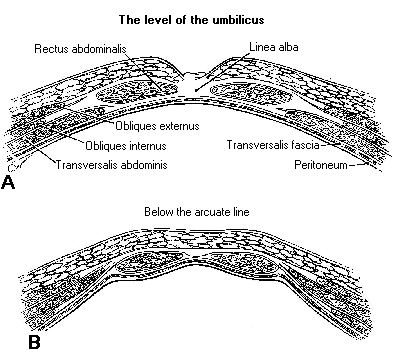 |
To reduce the risk of bowel and major vessel injury, the initial trocar and Veress needle may be placed in left upper quadrant at a point half way between the middle of the left costal margin and the umbilicus. Palpation of the abdominal aorta and the sacral promontory aids in determining the angle of insertion for the needle and later for the trocar. A cutaneous (not through and through) incision is made prior to needle insertion for easier access. Most surgeons make the incision large enough to accomodate the primary trocar which will be inserted after the pneumoperitoneum is established. The Veress needle should be grasped by the hub. Counter-traction should be applied by grasping the skin and fat of the lower abdomen or by pulling on the Allis clamp holding the base of the umbilicus or by pulling on two towel clips placed 2-3 cm laterally to the incision. In very obese patients a more vertical initial orientation of the needle may be necessary in order to enter the peritoneal cavity. Correct placement of the Veress needle can be verified by a variety of ways. In a well-anesthetized patient, the difference between the operating pressure of the insufflator outside and within the abdomen should be no greater than 5 mmHg. If higher pressures are recorded, then the surgeon should suspect that the needle is not placed properly. Occasionally this is due to placement of the needle tip in the omentum which can easily be dislodged by gently elevating the lower abdominal wall and shaking it. If this fails, the needle hub should be manipulated in a different direction since the distal hole may be impinging against the anterior abdominal wall. If neither of these maneuvers relieves the increased pressure, the Veress needle should be removed and a second attempt should be made. Occasionally, on passing through the different layers of the abdomen, some tissue may get lodged in the tip thus obstructing its opening. If the Veress needle needs to be withdrawn because of high pressures, it is prudent to carefully examine the tip for tissue. In some cases other manouver are required to insure the correct positioning (Table 1)
Table 1. Tests to confirm the proper position of the Veress needle.
| 1) Hanging drop test. |
| 2) Injection and aspiration of fluid through the Veress needle * |
| 3) An unimpeded arc of rotation of the needle to detect anterior abdominal wall adhesions |
| 4) loss of liver dullness early in insufflation* |
| 5) Sound of air entering Veress needle with elevation of the abdominal wal |
| 6) Free flow of gas through the Veress needle |
| 7) Observation of the fluctuation of pressure gauge needle with inspiratory and expiratory diaphragmatic motions |
Once one liter of gas has been insufflated, the surgeon should percuss
the right costal margin in order to demonstrate loss of liver dullness.
This is one of the most convincing demonstration of correct placement of
the Veress needle, although not foolproof. Once adequate pneumoperitoneum
is achieved, veress needle is withrawn and a 10-12 mm trocar is introduced
into the abdomen. The insertion of the laparoscopic trocar is a maneuver
that depends on the operator maintaining adequate control of the perforating
instrument. As the trocar penetrates each layer of the anterior abdominal
wall, there are associated sensations which the experienced operator learns
to anticipate and interpret. Successful insertion of the laparoscopic trocar
depends on:
1) An adequate skin incision,
2) An instrument in good working condition
3) Proper orientation of the trocar
4) Appropriate insertion force
5) Control over depth of insertion of the instrument.
The trocar and its sleeve are grasped by the operator with the index
finger extended to the point of maximal planned penetration. The extended
finger acts to prevent the sharp trocar tip from thrusting too deeply and
causing intraabdominal injury. It is important that the surgeon use the
dominant hand for this procedure since there is little room for error.
The remainder of the fingers grasp the trumpet valve or the insufflation
valve. The trocar itself is palmed. The trocar is rotated in a semi-circular
fashion with its long axis while controlled, firm, downward pressure is
being applied. In some cases can be helpful the countra-traction exerted
by the two towel clips previously placed for Veress needle insertion. As
the trocar is advanced, the operator will sense when the fascia has been
traversed, at which point the force is relaxed as the trocar is slowly
advanced to enter the peritoneum. The correct placement of the trocar is
confirmed by the free escape of gas when the sharp trocar is removed form
its sleeve. Direct insertion of the laparoscopic trocar, without previous
pneumoperitoneum, as well as insertion of blunt trocar after preparing
the fascia has been reported to be safe alternatives to Veress needle insertion.
After correct principal trocar placement, the omentum and bowel directly
beneath the trocar should be inspected first, as well as the big pelvic
vessels. This is important because this is where Veress needle and trocar
injuries are more likely to occur and become evident either as bleeding
or as spillage of bowel content. a general survey of the pelvis is then
undertaken so that all of the pelvic structures are in view of the laparoscope
to provide the operator with a panoramic view. The laparoscope is then
moved to evaluate the liver, the diaphram, the gall bladder and the spleen.
Trandelemburg position is then asked and accessory trocars are placed.
The site of accessory trocar placement depends on the patient’s anatomy,
the contemplated procedure and operator’s preference. Two 5 mm accessory
trocar are generally placed three fingerbreadths above the symphysis pubis
at the outer border of the rectus muscle.
| To minimize the risk of injury to intraabdominal organs and epigastric vessels, and to be sure that they are placed high enough to clear the fundus of the uterus to gain free access to the posterior cul de sac it is important to insert the accessory trocars under direct visualization from the laparoscope. The inferior epigastric vessels invariably run lateral to the umbilical ligaments, and are easily identified laparoscopically. In order to avoid these vessels, the trocar may be inserted medial to or straight through the umbilical ligaments, or laterally to the internal inguinal ring under direct visualization of the underside of the abdomen using the laparoscope. In order to avoid trauma to the abdominal structures, the site of secondary puncture should be indented by applying abdominal pressure with the index finger and observed with the laparoscope. This maneuver is particularly important in a patient who has evidence of anterior abdominal wall adhesions. The site of the indentation is inspected to insure it provides the necessary access. |  |
The trocar is held with the index finger extended on the sheath to control the depth of penetration. The trocar and sheath are inserted through the skin, fat and fascia and further advancement is controlled under direct laparoscopic visualization. It is important that the trocar be aimed toward the hollow of the sacrum just as other instruments are inserted. If the trocar is aimed toward the pelvic sidewall, it is possible that the trocar can go down the pelvic sidewall without being visualized through the laparoscope. The initial phase of the laparoscopy is to explore the pelvic anatomy, to assess and map out the extent of disease, preferably with photographs or videorecordings, identify anatomic landmarks and become familiar with the patient’s pelvic anatomy. Each laparoscopic procedure offers a lesson in anatomy and a wonderous sight of the abdominal organs, whose anatomic relationship and integrity may be viewed from a panoramic perspective or close up for microscopic inspection. There are many reasons why it is important to perform a thorough diagnostic evaluation and to document the initial findings at the time of laparoscopy. First, a complete survey of the pelvis will allow the operator to plan the surgical procedures to be performed. Second, careful documentation of the operative record allows the surgeon to refer back to the procedure, particularly if a second laparoscopic procedure is subsequently performed.
| Third, it serves as a reference for determining future
treatment of the patient. Finally, it serves as an excellent tool to educate oneself, residents and patients. It is important that the exam be conducted in a standardized and thorough manner, and be completed soon after the laparoscope and accessory trocar(s) are inserted. Forceps or blunt probes may be used to gently manipulate the organs of interest. After an overview of the upper abdominal cavity, laparoscope is directed over the pelvis. The appendix is inspected, then the laparoscope is directed closer to the left adnexa, the ovary is lifted, if possible, and the pelvic sidewall is carefully inspectedThe ovary is then released and the scope then placed over the anterior cul de sac and swept over to the right adnexa. Again the right ovary is elevated and the pelvic sidewall is carefully inspected. The cul de sac is then carefully evaluated |
 |
| The peritoneal surface of the abdominal cavity is then investigate for the presence of endometriosis. The typical endometriotic powder burn lesions, traditionally thought to be the hollmark of endometriosis, is now considered to be inactive disease containing “burned out’ stroma and glands, embedded in hemosiderin deposit. These deposits appear to be more common in older women and are not necessarily associated with infertility. In contrast, the atypical and non-pigmented lesions, manifested by clear vesicles, pink vascular patterns, white-scarred lesions, red lesions, yellow-brown patches and peritoneal windows, as summarized in table 2, are more likely to represent active endometrial glands and stroma which may be indicative of more progressive and active diseaseas suggested by both their viability and ability to secrete prostaglandin in the perioneal fluid. |  |
Table 2. Histologic confirmation of Endometriosis by its Appearance
at Laparoscopy
| Clinical Appearance | Histologic Confirmation Rate of Endometriosis |
Clinical Appearance | Histologic Confirmation Rate of Endometriosis |
|---|---|---|---|
| Typical- dark, black |
90% |
Intra-ovarian cysts |
48% |
| White-opacified |
81%-91% |
Yellow-brown patches |
47% |
| Red, flame-like |
75%-81% |
Circular peritoneal defects |
45% |
| Glandular lesions |
67% |
Hemosiderin lesions |
33% |
| Subovarian adhesions |
50% |
Normal peritoneum |
13%-25% |
Besides the variability in appearance and depth, endometriosis may actually be microscopic and thus invisible at surgery. Microscopic endometriosis has been documented by light and electron microscopy in normal appearing peritoneum, not only in patients with visible endometriosis in other areas of the pelvis, but also in patients with unexplained infertility in whom no endometriosis was seen at the time of laparoscopy. Vasquez et al documented microscopic endometriosis by electron microscopy on the surface of randomly biopsied normal appearing peritoneum in women with unexplained infertility and no obvious evidence of endometriosis . Besides the technical limitations in trying to totally excise the disease, its microscopic presentation may preclude any hope of surgical resection, since one cannot treat what one cannot see. To enhance visual detection of endometriosis in its atypical or microscopic presentation, Redwine has suggested “near contact laparoscopy”, which magnifies the peritoneal area, and “painting” the peritoneum and broad ligament with blood or serosanguinous fluid from the cul de sac, which renders the atypical or microscopic lesions more evident. As with the peritoneum, normal appearing ovaries may not be normal at all, instead they may contain endometriosis under its apparently normal cortex.
| The presence of small subcortical ovarian cysts at ultrasoud examination, may be further explored at surgery with needle aspiration for small endometriomas. Once the pelvic structures are accurately visualized, the cul-de-sac is filled with fluid (Ringer’s lactate) and the adnexae are allowed to float in the clear fluid. Filmy adhesions which are usually difficult to identify on the surface of the ovary will be clearly visible, as they float away from the ovarian cortex in the water.These adhesions can now be grasped with the forceps, sharply cut and removed from their attachments. Under fluid, because of excellent visualization, microsurgical adhesiolysis with sharp scissors can be precise, effective and totally atraumatic, since only the floating filmy adhesions will be grasped (manipulated) and resected. A thorough evaluation of the fimbrial folds is essential for the anatomixal assessment of the infertile patient. It is also best performed under fluid As the fimbrial folds float and disperse in the water, the adhesions between them become clearly visible to grasped, stretched and sharply cut. |  |
Chromotubation is then performed. Finally, the entire peritoneal cavity is irrigated copiuosly with isotonic fluid, usually Ringer’s lactate, and thoroughly inspected, looking for further pathology, debris (blood clots, pieces of adhesions, cyst wall, endometriosis implants) or bleeding. At this pont, any bleeders should be identified and coagulated with bipolar forceps. Because the pressure created by the pneumoperitoneum may tamponade bleeding from small venules or capillaries, we temporarily evacuate the gas and inspect again for bleeding while re-insufflating the abdominal cavity. The presence of clear irrigating fluid confirms adaquate hemostasis. At this point we are ready to terminate the procedure by evacuating the abdomen of the CO2 gas. The CO2 gas which is used to distend the abdomen must be completely evacuated to avoid postoperative pain. Of all of the postoperative problems which are commonly seen, the patients complain most vehemently about the referred shoulder pain from gas trapped under the diaphragm. Therefore, it is important that the surgeon attempt to remove as much of the trapped gas as possible. A procedure which we have used quite successfully involves keeping the patient in Trendelenberg position as the instruments are removed from the trocar sleeves. The gas is disconnected and as much of the pneumoperitoneum as possible is allowed to escape from the umbilical and the two suprapubic trocars. Since the patient is in a Trendelenberg position, the majority of the gas will be trapped in the suprapubic area. Therefore the umbilical trocar can be removed at this point and the remainder of the gas is milked out of the trocar sleeves by applying moderate upper abdominal pressure. We usually leave within the abdominal cavity 500-1000 cc of Ringer’s lactate solution which may serve two important purposes. The large fluid volumes displaces the gas, further promoting its full evacuation from the abdominal cavity and decreases postoperative shoulder pain. The second purpose, which is more tenuous but may be even more important, is the potential for decreased formation of postoperative adhesions associated with the use of large volumes of isotonic solution. Since this procedure has been instituted, the prevalence of shoulder pain has dramatically decreased. The incisions used for the accessory trocars (5 mm) can be closed using steri strips. Alternatively an inverted subcutaneous suture of 4-0 Dexon or Vicryl can be utilized. A similar sort of closure can be used for vertical umbilical incisions. Incisions for trocars larger than 10mm need to be closed in layers with particular attention paid to closure of the fascia.
References
Vernon MW, Beard JS, Graves K et al: Classification of endometriotic implants
by morphologic appearance and capacity to synthesize prostaglandin. Fertil
Steril 46:8, 1986
Nezhat CR Luciano AA, Metzger DA, Nezhat FR, Siegler A, Nezhat CH. Operative
Gynecologic Laparoscopy Priniciples and Technique. Mc Graw-Hill 1994;p121
NY New York
Vasquez G, Cornillie F, Brosens IA: Peritoneal endometriosis: scanning
electron microscopy and histology of minimal pelvic endometriotic lesions.
Fertil Steril 42:696, 1984
Nisolle M, Paindavene B, Bourdon A et al: Histologic study of peritoneal
endometriosis in infertile women. Fertil Steril 53:984, 1990
Redwine DB: Peritoneal blood painting: an aid in the diagnosis of endometriosis.
Amer J Obstet Gynecol 161:865, 1989
Last update Feb-14-1997 by E. Solima and P.G. Paesano
